Return to Hobie.com
Hobie Forums
It is currently Wed Apr 24, 2024 9:41 am

All times are UTC - 8 hours [ DST ]


Post new topic Reply to topic  [ 5 posts ] 
Author Message
PostPosted: Mon Sep 15, 2014 9:34 am 
Offline
Site Rank - Deck Hand

Joined: Sun Sep 14, 2014 11:56 pm
Posts: 1
(my first time posting, but I have enjoyed & benefitted from this community's knowledge base for a couple years... thanks in advance for any tips)
My trusty old 2007 (I think) Mirage Tandem (pre-"Oasis") has a hull issue. I can't afford to replace her with a new one.
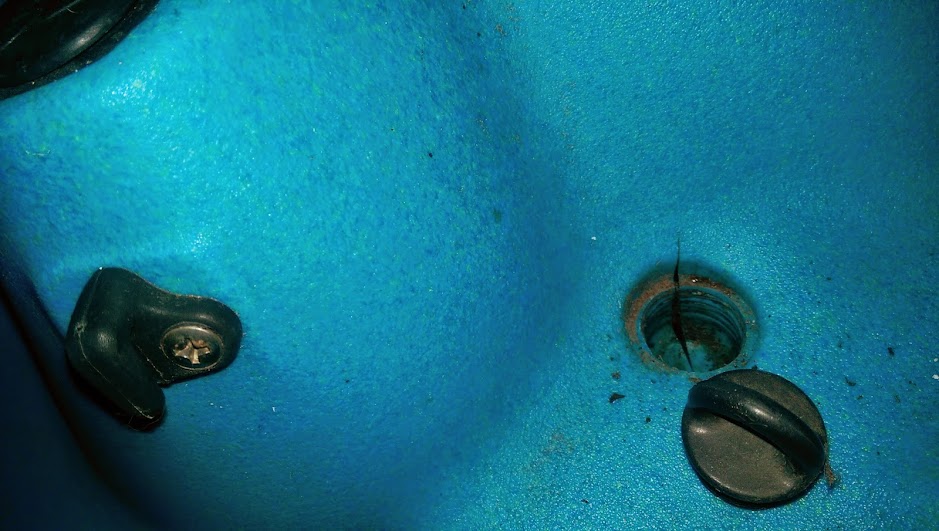
I just noticed that to the starboard side of the aft drive well, there is a threaded plug whose receiver (the part of the hull that is threaded to receive the plug) is cracking. There are some helpful posts about plastic weld products, and I am reasonably handy, but before I begin, does anyone have advice? Also, I'm not sure what this threaded bung is intended for (old owner's manual is lost), as it doesn't open/close off anything except a thimble-sized compartment, which couldn't hold enough rum to have any effect. I'm thinking that the plug itself (which has a raised half-ring and could have something clipped to it) was probably the intended function.
Due to a back injury, this kayak sat for a couple years (out of the sun, under a deck), but thanks to physical therapy, I was excited to take her out again before weather becomes unpleasant. Any words of wisdom out there?Image


Top
 Profile  
 
PostPosted: Mon Sep 15, 2014 3:23 pm 
Offline
Site Rank - Old Salt

Joined: Sun Aug 12, 2007 5:17 pm
Posts: 679
Location: Auckland NZ
That fitting would not appear to be in a high stress area and I think you have probably been very unlucky to get a crack there. Given that there is probably little stress in/around the plug I would have thought it an ideal subject for a plastic weld repair and I think you have a very high probability of success.

If you can't find a plastic weld 'professional' in your area you can buy the equipment from Hobie who also sell colour matched plastic for repairing with and I imagine with a little practice you will be able to make a passable imitation of a professional job. The basic concept is to heat the plastic until it gets to a melting point and then melt/mash some new plastic into the gap so that it all mixes up and sets as a hole-free unit when it cools... so you might even be able to get away with using a soldering iron, rather than a proper plastic welder, for example.

Once welded you may struggle to get the plug back in (because you may find it difficult to replicate the threads in the hull into which that pad-eye fitting screws) but since you haven't apparently been able to determine exactly what the fitting is for in the first place I suspect you may not be too bothered about that detail.

...and if a plastic weld is not feasible or successful you could probably effect a perfectly serviceable semi-permanent botch repair with some sort of marine-grade silicone adhesive/sealant though the colour match might not be possible.

Just my $0.02. Good luck!


Top
 Profile  
 
PostPosted: Mon Sep 15, 2014 5:08 pm 
Offline
Site Rank - Old Salt

Joined: Thu Aug 16, 2007 2:25 pm
Posts: 2866
Location: Central Coast NSW Australia
I agree with all that stobbo has posted.
That crack is not in a stress area. It is a similar problem to the seat peg holes cracking and Hobie has a kit that reinforces and seals from underneath. You could try that method (if it's within reach?), as an alternative fix, though you may need bigger cups. I'd also consider drilling a small hole at the end of the split to stop it spreading before applying the sealant.
If you look through these posts you will get some ideas
viewtopic.php?f=11&t=25029&p=106055
viewtopic.php?f=69&t=40645
Here is the video detailing how to do it.
http://www.youtube.com/watch?feature=pl ... XWfARZd6E0
BTW: It may be an optical illusion but that padeye seems to have very little thread underneath it ?


Top
 Profile  
 
PostPosted: Mon Sep 15, 2014 9:27 pm 
Offline
Hobie Approved Guru

Joined: Sat Nov 12, 2005 10:46 pm
Posts: 3017
Location: Escondido
Both great suggestions! If you go the plastic weld route you might consider filling the entire hole with melted plastic (be very careful about heating the hull directly unless you're experienced at it) and eliminate the fitting if not used.

Or, after drilling the crack ends, you could just apply clear silicone caulk and screw the fitting back in (after cleaning and deburring of course). This might look a little neater, especially if you can't get a color match with your plastic weld. Either way you avoid any depression that might provide a sump for a possible future leak.

Epoxying an appropriately sized PVC end cap on the protrusion from underneath may be another alternative if you can't find an appropriate kit (depending on how the under side is formed) if you can reach it. 8)


Top
 Profile  
 
PostPosted: Tue Sep 16, 2014 5:39 am 
Offline
Site Rank - Old Salt

Joined: Sun Apr 20, 2008 6:18 am
Posts: 3062
Location: Sarasota,Key West FL
If your not comfortable repairing the crack yourself, you can take the boat to pretty much any Hobie dealer and they (for a small fee) repair the boat for you (it's actually an easy repair and most kayak dealers have skilled people on staff that fix this kind of stuff all the time). At our local Hobie dealer (economy tackle in sarasota fl) every time I go in there they have kayaks of all brands being repaired, and they are very good at it.
If you want to try to fix yourself, the goal of the repair is to prevent water intrusion, and prevent the crack from spreading ( think of a piece of partially torn paper, to stop it tearing further just punch a hole at the end of the tear (try it on a piece of writing paper). You will want to do something similar.
On an older boat appearance is secondary in my opinion. If it were me I would just drill a small hole at the end of the crack (as suggested), clean the area well then just pump clear silicone into the threaded hole, screw the plug in, then just pump the silicone into the crack as if your calking a window in your house and call it good. Just wipe up the excess silicone with your finger so nothing is sticking up, and call it a day. Who cares if you can see it, then just go out and have fun.
Hope this helps
Bob


Top
 Profile  
 
Display posts from previous:  Sort by  
Post new topic Reply to topic  [ 5 posts ] 

All times are UTC - 8 hours [ DST ]


Who is online

Users browsing this forum: No registered users and 2 guests


You cannot post new topics in this forum
You cannot reply to topics in this forum
You cannot edit your posts in this forum
You cannot delete your posts in this forum

Jump to:  
© Hobie Cat Company. All rights reserved.
Powered by phpBB® Forum Software © phpBB Group