Return to Hobie.com
Hobie Forums
It is currently Wed Apr 24, 2024 9:23 pm

All times are UTC - 8 hours [ DST ]


Post new topic Reply to topic  [ 9 posts ] 
Author Message
PostPosted: Fri Dec 11, 2015 12:00 pm 
Offline
Site Rank - Old Salt

Joined: Sat May 09, 2015 8:53 am
Posts: 717
Location: Paoli Pennsylvania - East Coast USA
Seems like the mainsheet cleat on the fore X-Bar is begging to be angled downwards instead of laying flat/horizontal.

To Wit:


This is so obvious to me - yet seemingly not so obvious to the Hobie designers - that I have to wonder if I am missing something.

Am I missing something ?

If not, has anybody got a way to accomplish this without drilling/tapping any more holes in the X-Bar ?..... maybe some sort of adapter plate.... or a different type of cleat ?

I've got the right drill and the right tap.... but it feels wrong to drill any more holes in such a key structural component.

The Brass Ring would be a setup where the line does not automagically cleat itself by default - allowing one to sail uncleated in dicey conditions with shoulder/arm in a safe attitude.

But being to uncleat quickly/easily/dependably would be good enough.

I am aware of the mod that relocates the cleat to the starboard gunwale - but am not in love with that mod because it presents yet another place to snag one's bod when doing a deep-water remount.

(NB: I haven't gone completely over the edge and removed the X-Bar..... the one shown is one that was damaged in shipment/replaced when I got the boat....)

_________________
2015 AI in "Dune" - "The Grey Pig"
2017 Trailex 450 Trailer
Pre-September 2015 cradles
(anybody want to buy a slightly-used AI SpinKit?)
eMail: [email protected]


Last edited by PeteCress on Fri Dec 11, 2015 12:18 pm, edited 10 times in total.

Top
 Profile  
 
PostPosted: Fri Dec 11, 2015 12:11 pm 
Offline
Site Rank - Old Salt

Joined: Thu Aug 07, 2014 10:40 am
Posts: 927
Location: Blacklick, Ohio
Harken makes wedges that might work to reposition the cleat. You might need to cut some new screws to the correct length, but other than that it should be easy enough to accomplish. I switched my cleat out with an extreme angel fairlead. I had trouble cleating and uncleating from the tramps when hiked out due to the angle.

_________________
2015 Hobie Tandem Island Hibiscus
"Third Normal Form"

  • Trampolines
  • Hobie cover
  • Davis Spar Fly
  • Kayakbob's Sprayskirts
  • Spine Board Hakas


Top
 Profile  
 
PostPosted: Fri Dec 11, 2015 12:29 pm 
Offline
Site Rank - Old Salt

Joined: Sat May 09, 2015 8:53 am
Posts: 717
Location: Paoli Pennsylvania - East Coast USA
TI_Tom wrote:
Harken makes wedges that might work to reposition the cleat. You might need to cut some new screws to the correct length, but other than that it should be easy enough to accomplish. I switched my cleat out with an extreme angel fairlead. I had trouble cleating and uncleating from the tramps when hiked out due to the angle.

I was thinking maybe a Swivel Cam like this: https://www.google.com/url?sa=i&rct=j&q ... 62723...... only with the tab that holds the cams bent way downwards instead of upwards.

The critical point being that the screw spacing be the same as what's already there on the X-Bar.... But the leverage feels wrong with the holes left-to-right instead of fore-aft and that lever arm to the cleat trying to twist the bolts out.

_________________
2015 AI in "Dune" - "The Grey Pig"
2017 Trailex 450 Trailer
Pre-September 2015 cradles
(anybody want to buy a slightly-used AI SpinKit?)
eMail: [email protected]


Top
 Profile  
 
PostPosted: Fri Dec 11, 2015 12:43 pm 
Offline
Site Rank - Old Salt

Joined: Thu Jun 01, 2006 1:16 pm
Posts: 605
Location: Colorado
This is for the back seat of a TI but I had issues releasing the sheet cleat when there was a big load from the sail.. ended up moving both the cleat and the pulley (block). Its much more comfortable now. I first just moved the cleat and then the pull angle was too "low". Moving the pulley back then improved the pull angle to what is comfortable for me.

Image

In the picture below, you can see the original locations

Image


Top
 Profile  
 
PostPosted: Fri Dec 11, 2015 3:04 pm 
Offline
Site Rank - Old Salt

Joined: Sat May 09, 2015 8:53 am
Posts: 717
Location: Paoli Pennsylvania - East Coast USA
walt wrote:
In the picture below, you can see the original locations

Image

Nothing special about mounting the new cheek block, right ?

i.e. just drill 4 holes in the hull and back up the nuts inside with washers ?

_________________
2015 AI in "Dune" - "The Grey Pig"
2017 Trailex 450 Trailer
Pre-September 2015 cradles
(anybody want to buy a slightly-used AI SpinKit?)
eMail: [email protected]


Top
 Profile  
 
PostPosted: Fri Dec 11, 2015 3:13 pm 
Offline
Site Rank - Old Salt

Joined: Thu Jun 01, 2006 1:16 pm
Posts: 605
Location: Colorado
You "should" use backing plates..

However.. Those spots are about impossible to get to (at least on the TI in the rear position) for backing plates so I mounted with just screws with additional AL plates that increased the number of screws used (screws are also tapped into the AL). Also, the force on the fasteners is all sheer rather than trying to pull the fastener out..

So.. just the screws are probably not the best.. but I also have a fair amount of time on that setup and nothing has budged in the slightest and I dont think it will.


Top
 Profile  
 
PostPosted: Fri Dec 11, 2015 5:18 pm 
Offline
Site Rank - Old Salt

Joined: Tue Jul 19, 2005 6:29 pm
Posts: 2763
Location: High Point, NC
Dump that cleat entirely. Put a horn cleat back next to your seat. Or the clamcleat. But put it back next to your seat instead of having it up ahead and up front.


Top
 Profile  
 
PostPosted: Sat Dec 12, 2015 5:35 am 
Offline
Site Rank - Old Salt

Joined: Tue Jun 19, 2007 6:14 pm
Posts: 3323
Location: South Florida
Walt, I like your new system. The TI, from the back seat with 3:1 leverage, and AI 2 are very similar. Many people are changing the cleat and/or block position on the AI 2. Seems a similar solution is needed for the TI. My AI 2 mod is shown here: http://www.hobiecat.com/forums/viewtopic.php?f=70&t=7276&start=750

I'm also going to do something about the furling line on the TI, because, with a passenger in the front seat, I cannot see what is going on with the furling line. Just thinking, maybe the furling line could be run along the port side and back, opposite the main sheet fittings.

Keith

_________________
2015 AI 2, 2014 Tandem

"Any intelligent fool can make things bigger and more complex ... It takes a touch of genius and a lot of courage to move in the opposite direction." A. Einstein

"Less is more" Anon


Top
 Profile  
 
PostPosted: Sat Dec 12, 2015 7:38 am 
Offline
Site Rank - Old Salt

Joined: Thu Jun 01, 2006 1:16 pm
Posts: 605
Location: Colorado
FYI, all the changes I am showing.. got the ideas from this forum. just cant remember exactly where or who..

Hopefully just a temporary detour from Petes subject.. on the TI, some people like the front seat better, some like the back seat better, I like the back seat better. There is some technique to tie the sheet and the furler line together (only works if you are solo) but I prefer those controls set up for the rear seat.

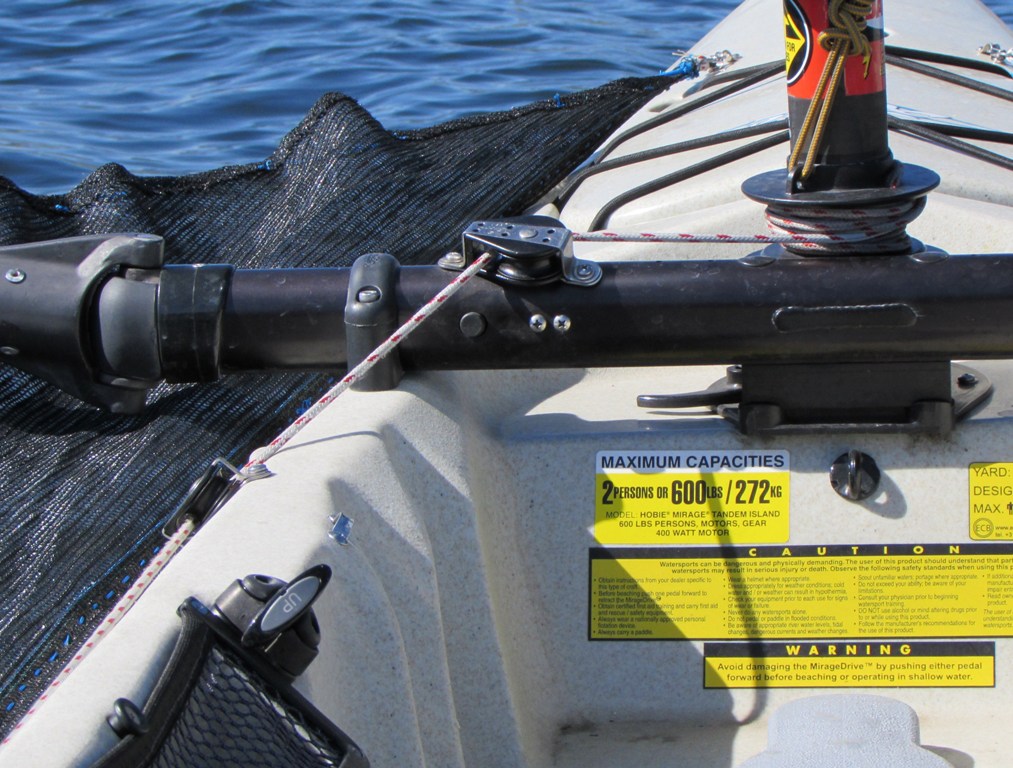
Running the furler line along the port side is what I have seen others do - its what I did also. The picture below shows the block just downstream from the fuler drum and a note about this is that if that block is a long distance away from the furler drum, its "easier" for the line to slip out of the furler drum and wrap where its not supposed to (not a good thing if your trying to furl to gain control). Notice on the stock setup that the pull for the fuler is close to the drum. Where I have that first block is mostly OK but I have had the line slip out of the drum once. If you just always keep the furler line a little snug no problem.. but its not perfect. Also an idea I got on these forums is that for the furler led to the rear, just leave the line on the hull. When you setup, tie the line to the furler. From the front I used to keep the line with the mast but I like the line staying on the hull a lot better.

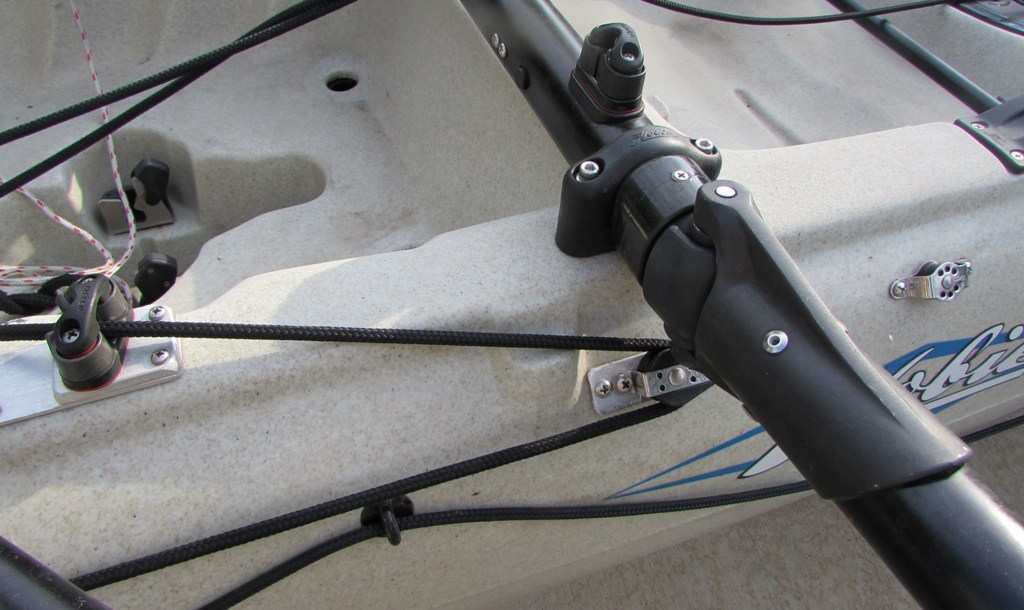
Picture below is that first block. An ideal setup might somehow use two blocks here. One placed very close to the furler drum (so little chance of the line slipping out of the drum when lax).

Image

Image

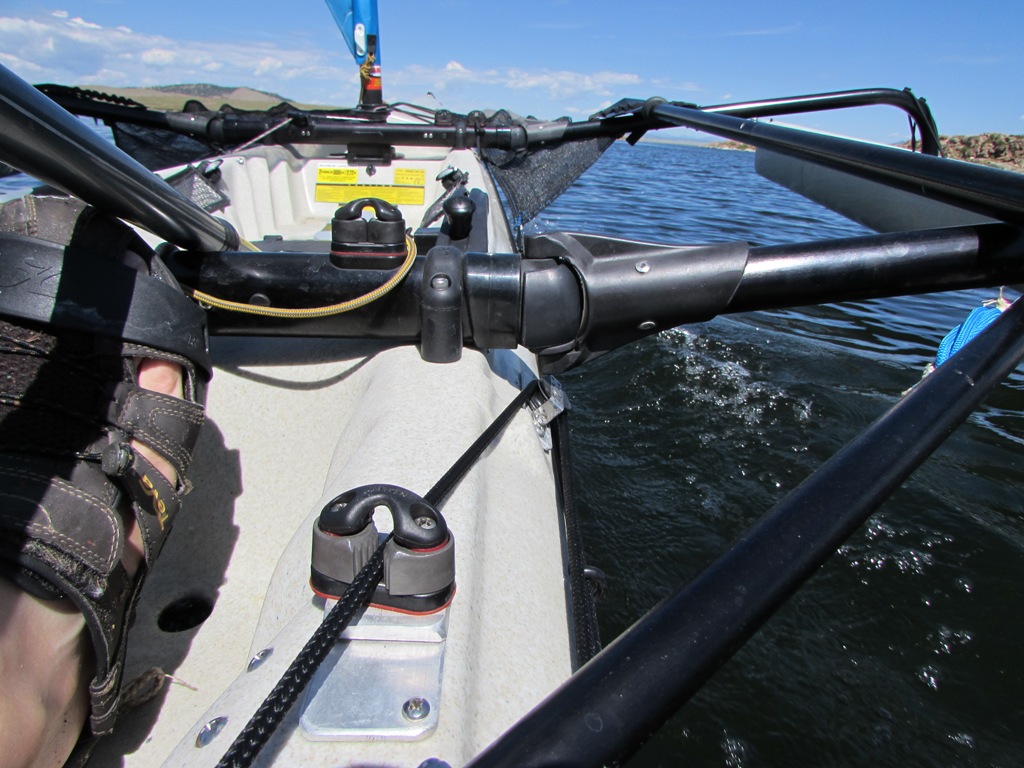
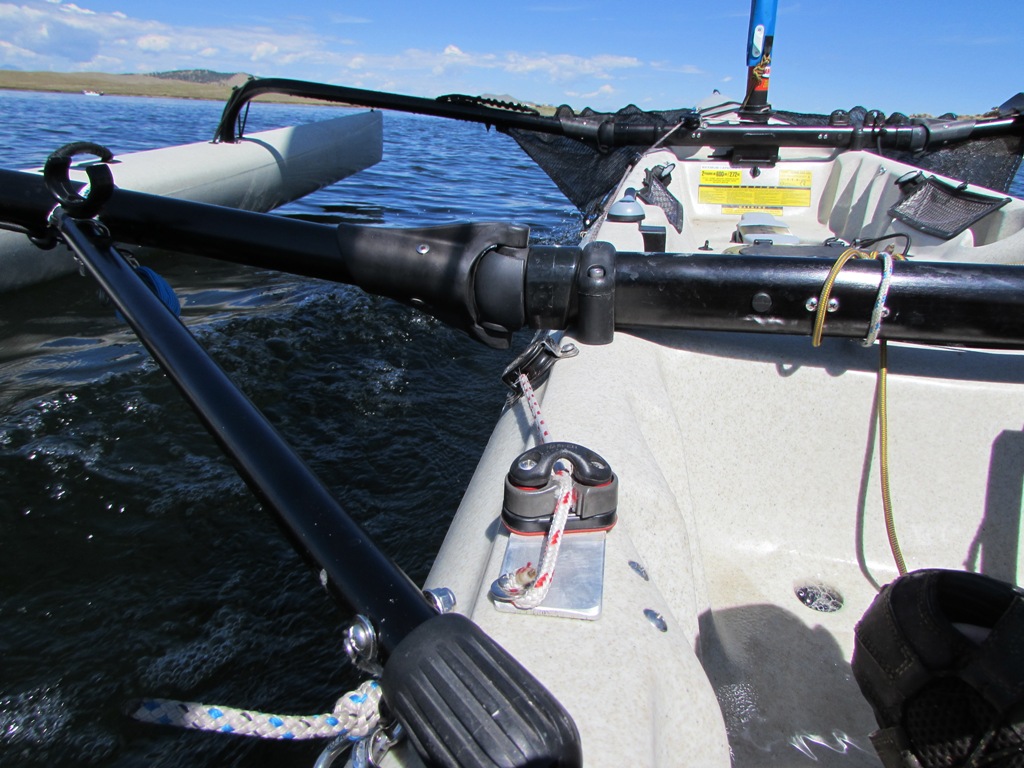
At the back seat, I originally had the cleat on the brace bar.. but moved the cleat back similar to how my sheet is (I think you did the same thing on your AI for the sheet) as I find this a lot easier spot to both pull and release from. Once again you can adjust the "pull angle" by the location of the block feeding the cleat.

Image

One final thing I did on my TI recently.. that sheet line is set up for both the front and rear seats. I always sail the boat from the rear and finally just got rid of the front seat sheeting ability -- I never used it. I simplified the rear keeping 2:1 but reduced the drag a little.

Edit - here is an older thread on this subject also viewtopic.php?f=69&t=37136&p=163258&hilit=rear+furling#p163258


Top
 Profile  
 
Display posts from previous:  Sort by  
Post new topic Reply to topic  [ 9 posts ] 

All times are UTC - 8 hours [ DST ]


Who is online

Users browsing this forum: No registered users and 2 guests


You cannot post new topics in this forum
You cannot reply to topics in this forum
You cannot edit your posts in this forum
You cannot delete your posts in this forum

Jump to:  
© Hobie Cat Company. All rights reserved.
Powered by phpBB® Forum Software © phpBB Group